How to Set Up SPF, DKIM, and DMARC Records for Microsoft 365
Learn how to configure SPF, DKIM, and DMARC DNS records for Microsoft 365 and verify email authentication.
In this post, I will explain three important DNS records for email authentication: SPF, DKIM, and DMARC.
These records are especially important when using Microsoft 365. Together, they help authenticate your email domain and prove to receiving mail servers that your messages are authorized and legitimate.
When configured correctly, SPF, DKIM, and DMARC help:
- Identify authorized email senders.
- Confirm that messages have not been modified.
- Prevent attackers from sending messages on behalf of your domain.
- Improve email deliverability.
- Provide visibility into failed authentication attempts.
SPF: Sender Policy Framework
SPF is a DNS TXT record that specifies which IP addresses and mail servers are authorized to send email on behalf of a domain.
When a receiving mail server receives a message, it can query the sender’s SPF record and verify whether the sending server is authorized.
If Microsoft 365 is the only service sending email for your domain, your SPF record should look similar to this:
1
v=spf1 include:spf.protection.outlook.com -all
If a specific public IP address is also authorized to send email, include it in the SPF record:
1
v=spf1 ip4:22.33.44.55 include:spf.protection.outlook.com -all
Replace 22.33.44.55 with the public IP address of your authorized mail server.
Important: A domain should have only one SPF record. If you use multiple email services, combine all authorized senders into a single TXT record instead of creating multiple SPF records.
Check the SPF Record
You can verify your SPF record using the MXToolbox SPF Checker.
DKIM: DomainKeys Identified Mail
DKIM is an email-signing mechanism that allows a sending server to add a digital signature to outgoing messages.
The receiving mail server uses the public DKIM key published in DNS to verify that:
- The message was signed by an authorized system.
- The message content was not modified in transit.
- The message headers were not changed.
- The sender controls the domain used for signing.
Unlike SPF, DKIM does not depend primarily on the sending server’s IP address. Instead, it uses a private and public cryptographic key pair.
Create the DKIM CNAME Records
To enable DKIM for a custom domain in Microsoft 365, create two CNAME records in your public DNS zone.
Use the values provided by the Microsoft 365 Defender or Exchange admin center. The records generally follow this format:
1
2
3
Host name:             selector1._domainkey.<domain>
Points to:             selector1-<domainGUID>._domainkey.<initialDomain>
TTL:                   3600
1
2
3
Host name:             selector2._domainkey.<domain>
Points to:             selector2-<domainGUID>._domainkey.<initialDomain>
TTL:                   3600
For example, the records for mkvlab.com might look like this:
1
2
3
Host name:             selector1._domainkey.mkvlab.com
Points to:             selector1-mkvlab-com._domainkey.mkvlab.onmicrosoft.com
TTL:                   3600
1
2
3
Host name:             selector2._domainkey.mkvlab.com
Points to:             selector2-mkvlab-com._domainkey.mkvlab.onmicrosoft.com
TTL:                   3600
The exact target values depend on your Microsoft 365 tenant and domain. You can retrieve the correct values from the Microsoft 365 portal or Exchange Online PowerShell.
Enable DKIM Signing
Sign in to the Microsoft 365 admin center and open the DKIM configuration page.
Depending on the current Microsoft 365 portal layout, the option is available through the Microsoft Defender portal under:
1
2
3
4
5
Email & collaboration
> Policies & rules
> Threat policies
> Email authentication settings
> DKIM
Select your domain and enable:
1
Sign messages for this domain with DKIM signatures
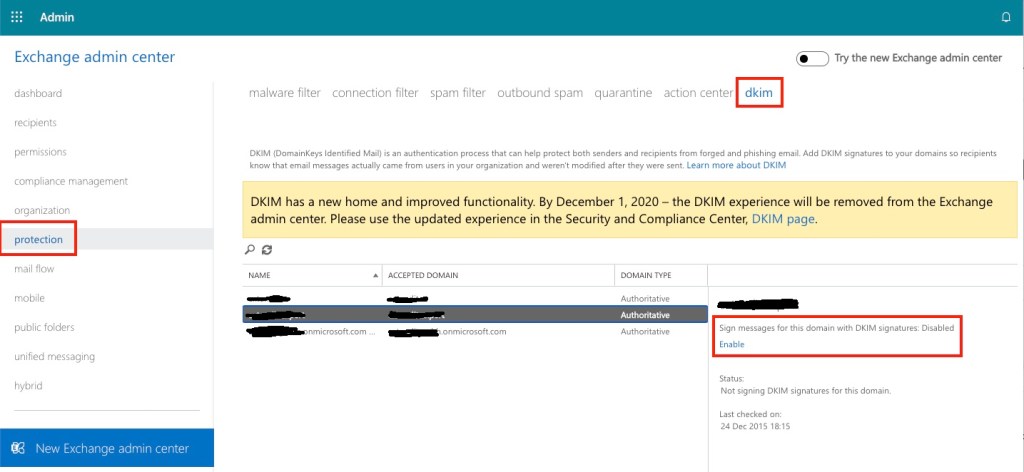
If the CNAME records are configured correctly and have propagated through DNS, you should be able to enable DKIM signing.
Note: The Microsoft 365 portal layout can change over time. If you cannot find the DKIM settings, search the portal for
DKIMor use the Exchange Online PowerShell module.
Generate the DKIM Signing Configuration
If the DKIM option is unavailable or you receive an error such as No DKIM keys saved for this domain, connect to Exchange Online PowerShell and create the DKIM signing configuration.
Create the configuration with DKIM disabled:
1
New-DkimSigningConfig -DomainName <DOMAIN> -Enabled $false
Replace <DOMAIN> with your custom domain.
After the configuration has been created and the CNAME records are available in DNS, enable DKIM signing:
1
Set-DkimSigningConfig -Identity <DOMAIN> -Enabled $true
For example:
1
Set-DkimSigningConfig -Identity mkvlab.com -Enabled $true
To check the DKIM configuration and status:
1
2
Get-DkimSigningConfig -Identity <DOMAIN> |
    Format-List
You can also use the Microsoft documentation for connecting to Exchange Online PowerShell.
Check the DKIM Record
Use the MXToolbox DKIM Checker to check a DKIM record.
You normally need to provide both the domain and selector, for example:
1
2
Domain:   mkvlab.com
Selector: selector1
DMARC: Domain-based Message Authentication, Reporting, and Conformance
DMARC is an email authentication, policy, and reporting protocol built on SPF and DKIM.
DMARC has three primary purposes:
- It verifies whether a message passes SPF and DKIM authentication.
- It tells the receiving mail server what to do when authentication fails.
- It sends reports to the domain owner about successful and failed authentication attempts.
DMARC is published as a DNS TXT record at:
1
_dmarc.<domain>
A basic DMARC record has the following format:
1
2
3
4
Host name:  _dmarc.<domain>
Value:      v=DMARC1; p=<policy>; rua=mailto:<email-address>
TTL:        3600
Type:       TXT
The p tag defines the policy for messages that fail DMARC authentication.
The available policies are:
none: Take no enforcement action, but allow reports to be collected.quarantine: Treat failing messages as suspicious, usually placing them in a spam or quarantine folder.reject: Reject messages that fail DMARC authentication.
A policy of none is useful when initially deploying DMARC because it allows you to collect reports and identify legitimate services before enforcing a stricter policy.
Create a DMARC Record
A DMARC record for mkvlab.com could look like this:
1
2
3
4
Host name:  _dmarc.mkvlab.com
Value:      v=DMARC1; p=reject; rua=mailto:[email protected]
TTL:        3600
Type:       TXT
The rua tag specifies the email address that receives aggregate DMARC reports.
These reports provide visibility into:
- Authorized systems sending email.
- Messages that pass or fail SPF.
- Messages that pass or fail DKIM.
- Potential spoofing or malicious activity.
- Incorrectly configured third-party email services.
Recommendation: Start with
p=none, review the reports, fix legitimate authentication failures, and then gradually move top=quarantineorp=reject.
Check the DMARC Record
You can verify your DMARC record using the MXToolbox DMARC Checker.
Test Email Authentication
After configuring SPF, DKIM, and DMARC, send a test email from the configured domain to an external mailbox.
Then inspect the message headers from the recipient’s perspective. The authentication results should show successful checks similar to:
1
2
3
spf=pass
dkim=pass
dmarc=pass
The exact header format depends on the receiving mail provider.
You can analyze the message headers using the Microsoft Remote Connectivity Analyzer Message Header Analyzer.
When reviewing the headers, verify that:
- SPF passed for the expected sending service.
- DKIM passed and used your domain.
- DMARC passed through SPF or DKIM alignment.
- The sending IP address belongs to an authorized service.
- The message was not routed through an unexpected relay.
- The
Fromdomain matches the expected authenticated domain.
Testing the headers confirms that the records are not only published in DNS, but are also being used correctly during real email delivery.